C. Setting Up the Testing Toolkit
To do basic information security reviews, we first need to get our testing environment set up. This includes preparing our Web browser, any mobile devices we will use to test, and installing some additional software on our local computer.
The tests in this document make extensive use of an intercepting proxy to observe, and in some cases modify, the network requests generated by the application under test. There are many proxies and tools that can be used, and the testing scenarios we describe are universal. However, to make the instructions in this primer as accessible as possible to as many people as possible, our instructions focus on tools that are freely available and -- ideally -- open source.
While the bulk of our tests rely on an intercepting proxy to power more detailed analysis, two other tools -- a cookie reader and a browser extension called Firebug -- are used as well. These two tools can often be used to do a quick, more cursory examination to determine which additional tests might be necessary.
Navigation: Getting Started
- C1 The Toolkit: A Summary
- C2 Installing and Using Firebug to Observe HTTP and HTTPS Traffic
- C3 Installing and Using Advanced Cookie Manager
- C4 Installing and Using ZAP Proxy to Observe HTTP and HTTPS Traffic
- C4.1 Installation and Initial Setup of OWASP ZAP
- C4.2 Basic Setup, Browser and Proxy on Same Computer
- C4.3 Setup for Testing Mobile Devices and/or Web Browsers on a Different Computer from the Proxy
- C4.4 Installing Proxy SSL Certificate on Browser and Mobile Devices
- C4.5 Observing WebSockets Traffic Using ZAP Proxy
C1 The Toolkit: A Summary
All of the tests documented in the primer are run using:
- the Firefox browser,
- with the Firebug extension,
- the Advanced Cookie Manager plug-in,
- and the OWASP Zed Attack Proxy.
Firefox is a free, open-source browser and can be downloaded here: https://www.mozilla.org/en-US/firefox/new/.
Firebug is a browser extension that enables observation of the network requests and responses for Firefox browsing sessions. It can monitor both http and https traffic. Because of its straightforward setup and integration with the browser, it is a good choice for tests that do not require the extra features of an external proxy such as OWASP ZAP.
More information about Firebug can be found at http://getfirebug.com/.
The Advanced Cookie Manager plug-in is a tool that lets us manipulate, inspect, and delete individual cookies. More information about the Advanced Cookie Manager is available at https://addons.mozilla.org/en-US/firefox/addon/cookie-manager/.
OWASP Zed Attack Proxy, or ZAP, is a freely available, cross-platform, and open-source proxy program developed and maintained by OWASP (Open Web App Security Project). It provides more advanced features than Firebug and can be used to monitor the network traffic of mobile devices, as well as programs or browsers running on any host on the tester's local network. ZAP downloads and documentation are available at the OWASP ZAP project page.
This rest of this section describes setting up the proxy and related testing tools and how to use these tools to perform the tests in this primer.
- Return to Navigation: Getting Started
C2 Installing and Using Firebug to Observe HTTP and HTTPS Traffic
To install Firebug, go to Tools --> Add-ons, search for "Firebug," and select it for installation to Firefox. A screenshot of the plug-in's description page (to ensure you are getting the correct plug-in) is shown below.

As mentioned above, Firebug is a good choice for tests that don't require the advanced functionality of an external proxy such as OWASP ZAP. After Firebug has been installed, it can be viewed by clicking its icon in the Firefox toolbar. In this setup tutorial, we explain how to use some of the tools that come with Firebug alongside screenshots that show them in action.
The image below shows the Firebug icon in the toolbar, with configuration options that can set user preferences.

The Firebug display is shown below. The Net tab shows the network requests and responses; make sure that the Persist and All options are selected.

The Persist option prevents the display from being cleared on each new page load. However, Firebug will collapse prior pages in its display, and the tester may need to expand them back out to view the relevant transactions.
In the example below, the user has logged out of a service, and the browsing session prior to the logout has been collapsed.

Clicking the highlighted triangle for that portion of the session will expand the display for this part of the session.

Hovering the mouse over the transaction's entry will show the full URL, enabling a check for https on the request.

The transaction's entry can also be expanded by clicking the triangle next to the transaction's entry.

The descriptions of individual tests in the testing scenarios give more details on how to find the important parts of the request and response in the Firebug display for the test in question. Firebug is a useful tool for initial examinations of Web pages, as it can be used to detect basic issues that merit additional testing. If an application opens new browser tabs or views as the user interacts with it, it may be necessary or more straightforward to observe the traffic in an external proxy (such as ZAP, described below).
- Return to Navigation: Getting Started
C3 Installing and Using Advanced Cookie Manager
Cookies are small text strings sent by servers to browsers in http responses as the user interacts with a Web service. The browser saves the cookie values and includes them with subsequent http requests to the same application or domain. The use of cookies allows Web services to maintain the "state" of a session so that previous interactions can be taken into account when new requests arrive. A cookie editor can be used to examine and modify an application's cookies, and these capabilities are utilized by the test procedures for authentication cookies and cookie handling, covered in Section E5 Authentication Token and Cookie Handling.
The examples in this document use the Advanced Cookie Manager plug-in for Firefox. To find it, go to Tools --> Add-ons, search for "cookie managers," and select Advanced Cookie Manager for installation to Firefox. A screenshot of the plug-in's description page is shown below.

Once installed, the cookie manager can be opened by clicking its icon in the browser add-ons toolbar or from the add-ons menu. An annotated view of the Advanced Cookie Manager panel is shown below.

During several of the tests outlined in the testing scenarios, the cookie manager will be used to view cookies and their flags, delete cookies, save cookies to file, and restore cookies from file. Inspecting cookies is also helpful to learn more about which information is sent to different services on the Internet.
The Advanced Cookie Manager is the only component of our testing toolkit that is not open source, and it has one significant drawback, which we highlight below. We opted to include the Advanced Cookie Manager for use in this primer because after evaluating the other cookie managers available, Advanced Cookie Manager worked better. With that said, we are actively working on an open source option that will replace the Advanced Cookie Manager in future versions.
The main drawback of the Advanced Cookie Manager is that it includes a Facebook "like" button in its user interface. As a result, every time the Cookie Manager is loaded (by clicking on the icon), it calls to Facebook. This drawback is mitigated to an extent by the fact that, as part of preparing to run tests, we clear all cookies from the browser, which limits the information available to Facebook to little more than an IP address. However, even that is less than ideal, and future versions will remove this issue.
- Return to Navigation: Getting Started
C4 Installing and Using ZAP Proxy to Observe HTTP and HTTPS Traffic
As the name implies, an intercepting proxy intercepts and logs the requests and responses between a client (a browser or mobile app) and the network resources with which it interacts. This enables observation of the behavior of the application without interfering with its functionality.
Setting up a proxy on your computer allows the user to review all network traffic on that computer in greater detail. While Firebug allows the user to see some transactions, an intercepting proxy provides a more comprehensive picture. For example, a portion of a proxy log from loading "graphite.org" in a browser is shown below:

Once a browser or mobile device has been configured to send traffic to a proxy, the proxy can observe and capture http (non-encrypted) traffic without additional setup. However, capturing https traffic requires additional steps. A detailed technical description of https (SSL) and TLS are beyond the scope of this document. However, a general description of how a proxy can observe https traffic, along with basic setup steps, is included below.
The normal operation of https creates an encrypted connection between the Web browser/app and the resources with which it communicates. Because the traffic is encrypted, the proxy is not able to decipher the encrypted contents of the messages sent or received. To see the encrypted traffic, we must configure the browser or device to "trust" the proxy and allow it to decode the https communication by installing an SSL certificate -- generated by the proxy -- in the browser or device. This SSL certificate allows the proxy to decrypt the messages as they are received by the user, and then re-encrypt the messages before sending them to the ultimate recipient. The following diagram from the OWASP ZAP documentation (image released under a CC-SA license) illustrates the connections among the user, the proxy, and Web resources.

ZAP Setup Instructions
The instructions for setting up OWASP ZAP are broken into five distinct sections:
- C4.1 Installation and Initial Setup of OWASP ZAP
- C4.2 Basic Setup, Browser and Proxy on Same Computer
- C4.3 Setup for Testing Mobile Devices and/or Web Browsers on a Different Computer from the Proxy
- C4.4 Installing Proxy SSL Certificate on Browser and Mobile Devices
- C4.5 Observing WebSockets Traffic Using ZAP Proxy
If you are primarily concerned with testing Web applications, you will not need to use any of the instructions in C4.3 Setup for Testing Mobile Devices and/or Web Browsers on a Different Computer from the Proxy.
If you are going to test mobile apps, then the instructions in C4.3 Setup for Testing Mobile Devices and/or Web Browsers on a Different Computer from the Proxy cover the details of preparing this testing environment.
Using ZAP Proxy requires more setup steps than other elements of the toolkit. Fortunately, these steps only need to be completed once. Additionally, in many cases, Firebug can be used to perform initial reviews that can determine whether a more detailed examination via an intercepting proxy is necessary.
C4.1 Installation and Initial Setup of OWASP ZAP
This primer focuses specifically on the features or ZAP we use for the tests covered in the testing scenarios, which is a small subset of all the features offered in ZAP. For a complete overview of the full feature set of ZAP, consult the full ZAP documentation.
ZAP is available for download at the ZAP project page: https://www.owasp.org/index.php/OWASP_Zed_Attack_Proxy_Project.
The download packages and installation instructions are platform-specific for Windows, Apple, and Linux. Choose the Standard package and follow the installation instructions for your desired platform.
C4.1.1 Modify Display Settings
After installation, modify the Display settings to enable process images in http requests/responses. This configuration causes image loads that may be of interest during testing to be displayed in the history log. In ZAP this setting is managed in the Tools --> Options --> Display menu.

Select the check box for Process images in HTTP requests/responses. Then, click the OK button.
- Return to Navigation: Getting Started
- Return to Navigation: OWASP ZAP Proxy Setup
C4.2 Basic Setup, Browser and Proxy on Same Computer
The most straightforward setup is when the browser and proxy are on the same computer.
C4.2.1 ZAP Local Proxy Address
Within ZAP, the local proxy address should be set up as "localhost" and the port set to 8080 (this is the default setting at install). In ZAP, this setting is managed in the Tools --> Options --> Local proxy menu.

Once you have verified that the settings in ZAP are correct, you can proceed to set the correct configuration in the browser you will use for testing.
C4.2.2 Browser Proxy Address
When the browser and the proxy are on the same computer, the proxy address in the browser should be configured to use a proxy at "localhost" and port 8080.
Firefox manages this in Preferences --> Advanced --> Network --> Connection Settings, as shown below.

- Select Manual proxy configuration.
- Set HTTP Proxy to "localhost" and Port to "8080."
- Select the option to Use this proxy server for all protocols.
Then, click the OK button.
To complete the setup, skip ahead to the C4.4 Installing Proxy SSL Certificate on Browser and Mobile Devices section below.
- Return to Navigation: Getting Started
- Return to Navigation: OWASP ZAP Proxy Setup
C4.3 Setup for Testing Mobile Devices and/or Web Browsers on a Different Computer from the Proxy
The steps in this section are only relevant in the following scenarios:
- testing traffic coming from a phone or a tablet;
- and testing traffic coming from multiple computers (for example, if the tests will compare traffic from a Chromebook, an Apple computer, and/or a Windows computer).
If you are not testing mobile devices, and/or if you are running ZAP on the same computer as the Web browser you will use for testing, you do not need to follow the steps in this section.
To configure ZAP to support testing with mobile devices, we need to complete two basic steps:
- Get the address of the computer running ZAP;
- and configure all testing devices to use that address.
The steps in C4.3 outline this process.
C4.3.1 Find the Network Address of the Proxy Computer
The first step is to determine the network address of the computer running ZAP Proxy. The procedure is different for Windows, Mac OS, and Linux.
When you find the network address of the computer running the proxy, write it down and store it in an easily accessible place. This network address needs to be added to other devices that will be used for testing.
C4.3.1.1 Windows:
The network address can be found under:
Control Panel --> Network and Internet --> Network and Sharing Center
From this dialog, select the active network, which will bring up a status menu. Select Details from this menu.

The Details dialog will display the network address of the computer. In almost all cases, the IPv4 address (not the IPv6 address) is the one that should be used as the proxy's network address, as shown below.

C4.3.1.2 Apple OS X:
The network address can be found in System Preferences --> Network, as shown below.

C4.3.1.3 Linux/Unix:
Many distributions include a System Preferences utility that can be used to find the computer's network address. Another option is to use the "ip address" command from the shell and look for the "inet" entry on the appropriate interface, as shown below.
$ ip address
1: lo: <LOOPBACK,UP,LOWER_UP> mtu 65536 qdisc noqueue state UNKNOWN group default
    link/loopback 00:00:00:00:00:00 brd 00:00:00:00:00:00
    inet 127.0.0.1/8 scope host lo
       valid_lft forever preferred_lft forever
    inet6 ::1/128 scope host
       valid_lft forever preferred_lft forever
2: eth0: <BROADCAST,MULTICAST,UP,LOWER_UP> mtu 1500 qdisc pfifo_fast state UP group default qlen 1000
    link/ether 00:0c:29:20:f6:c1 brd ff:ff:ff:ff:ff:ff
    inet 192.168.251.211/24 brd 192.168.251.255 scope global eth0
       valid_lft forever preferred_lft forever
    inet6 fe80::20c:29ff:fe20:f6c1/64 scope link
       valid_lft forever preferred_lft forever
In the example above, eth0 is the correct interface, and the address is 192.168.251.211.
C4.3.2 In ZAP Proxy: Change "Local proxy" Address
The proxy setup procedure is the same as covered in C4.2 Basic Setup, Browser and Proxy on Same Computer, except that the network address of the computer (which we discovered in the prior step) should replace the default addresss setting of localhost.

C4.3.3 In Firefox: Change the "Manual proxy configuration" Address
In Firefox, under Preferences --> Advanced --> Network --> Connection, select Manual proxy configuration and enter the network address found in the steps above.
Once the settings have been updated, click the "OK" button to save the changes.

C4.3.4 iOS Device Setup
On an iOS (Apple) device, go to Settings --> Wi-Fi, and make sure your device is on the same network as the proxy computer.
Select the info screen for the network the device is connected to.

The proxy settings are at the bottom of the network settings screen. Enable manual proxy settings and enter the network address found in the previous steps and the port number as shown below.

C4.3.5 Android Device Proxy Setup
Open the Settings menu and select Wi-Fi.

Press and hold the name of the network to bring up the network settings menu, and select Modify network.
Note: You need to give a longer-than-average "click" on the wireless name, in the range of one to two seconds, to bring up the Modify network option.

Select Show advanced options, and then select Proxy settings --> Manual. Use the network address and port number from step C4.3.1, as illustrated below.

Click the Save link to save the settings.
- Return to Navigation: Getting Started
- Return to Navigation: OWASP ZAP Proxy Setup
C4.4 Installing Proxy SSL Certificate on Browser and Mobile Devices
Installing the proxy's SSL certificate on browsers and devices will allow the proxy to decrypt the https traffic generated by these clients. In this section, we will cover using ZAP to generate an SSL certificate. Then, we will document how to save this certificate to our testing browser and/or a mobile device.
C4.4.1 Save Proxy Certificate to File
The proxy's SSL certificate can be saved from the ZAP Preferences --> Options --> Dynamic SSL Certificates menu. Open the dialog and click on Save.

The file will be saved as "owasp_zap_root_ca.cer" in the directory chosen by the user.
C4.4.2 Import Proxy Certificate to Browser
In Firefox, certificates can be installed in the Preferences --> Advanced --> Certificates dialog.
Within this dialog, select View Certificates.

In the View Certificates dialog, select Import.

Then, select the root certificate (owasp_zap_root_ca.cer) downloaded from the ZAP Proxy and open it, as shown in the screenshot below.

Then, select the option to Trust this CA to identify websites, and click the OK button.

Verify that the certificate has been uploaded by browsing to it. All certificate authorities are listed alphabetically. Once you have verified that the certificate has been uploaded, click the OK button.

Note: When you are not testing, you should remove the certificate from the browser.
To remove the certificate, in Firefox go to the Preferences --> Advanced --> Certificates --> View Certificates menu, select the "OWASP Zed Attack Proxy Root CA" certificate, and click on Delete or Distrust.

C4.4.3 Import Proxy Certificate to iOS Device
It is important to take care when transferring the certificate file to the device, as anyone who possesses it could potentially use it to decrypt https communications from devices that install the certificate. While this risk is small and can be mitigated by uninstalling the certificate when you're not testing, handling the certificate safely is highly recommended.
C4.4.3.1 Transfer Proxy Certificate File to the Device
A secure file-sharing service is one good way to transfer the file. For iOS devices, the file must be accessed from the file-sharing service using the browser, not the sharing service's iOS app. Accessing the file from within the browser interface for the sharing service will bring up the Install Profile dialog described in the next step of the setup.
C4.4.3.2 Install Proxy Certificate File on the Device
Once the certificate file has been transferred to the device, open it on the device. Opening the file will bring up the Install Profile dialog. (iOS refers to certificates with the broader term "Profile.") Select Install from within this dialog.

After a device password check, the Install Profile dialog will bring up a second dialog with a warning about installing a certificate to the device. Since the objective is to install the proxy's certificate to allow monitoring of https traffic, it is OK to accept the warning and select Install.

After the certificate is installed, a screen will confirm that the certificate was successfully installed.

Note: To remove the certificate after testing is complete, go to the Settings --> General menu and scroll down. The certificate will be listed under Profile.

Select Profile to enter a dialog that provides the option to delete the certificate.

C4.4.4 Import Proxy Certificate to Android Device
It is important to take care when transferring the certificate file to the device, as anyone who possesses it could potentially use it to decrypt https communications from devices that install the certificate. While this risk is small and can be mitigated by uninstalling the certificate when you're not testing, handling the certificate safely is highly recommended.
For Android devices, many methods of moving the certificate file to the device's storage (browser, secure file-sharing service, direct transfer over USB or an SD card) can be used.
C4.4.4.1 Transfer Proxy Certificate File to the Device
Copy the proxy certificate file to the Android's SD card or other internal storage. The tutorial below assumes that the certificate has been moved to an SD card.
C4.4.4.2 Install Proxy Certificate File to the Device
This document covers installation for Android versions 4.3 and above. The installation is slightly different for Android 4.3, Android 4.4, and higher. Select the installation that corresponds to your device's Android version.
Android 4.3:
In the Settings --> Security dialog, select Install from SD Card.

A dialog titled Name the certificate will pop up. Leave the name unchanged and select OK.

When you are not using the device to test, remove the certificate. To remove the certificate, go to the Settings --> Security --> Trusted credentials --> User dialog.
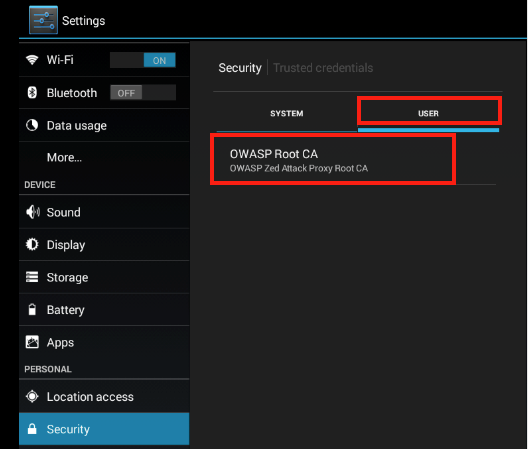
Select the OWASP certificate to bring up another menu with an option to remove the certificate.

Tapping the Remove button uninstalls the certificate.
Android 4.4 and higher:
In the Settings --> Security dialog, select Install from Storage.

A dialog showing the downloads directory will show up. However, the process usually requires the certificate to be accessed through internal storage instead, using the following sequence:
Select the menu tab at the top-left corner.

Select Internal storage from the menu.

Select the Download directory from the Internal storage choices.

Select the certificate file.

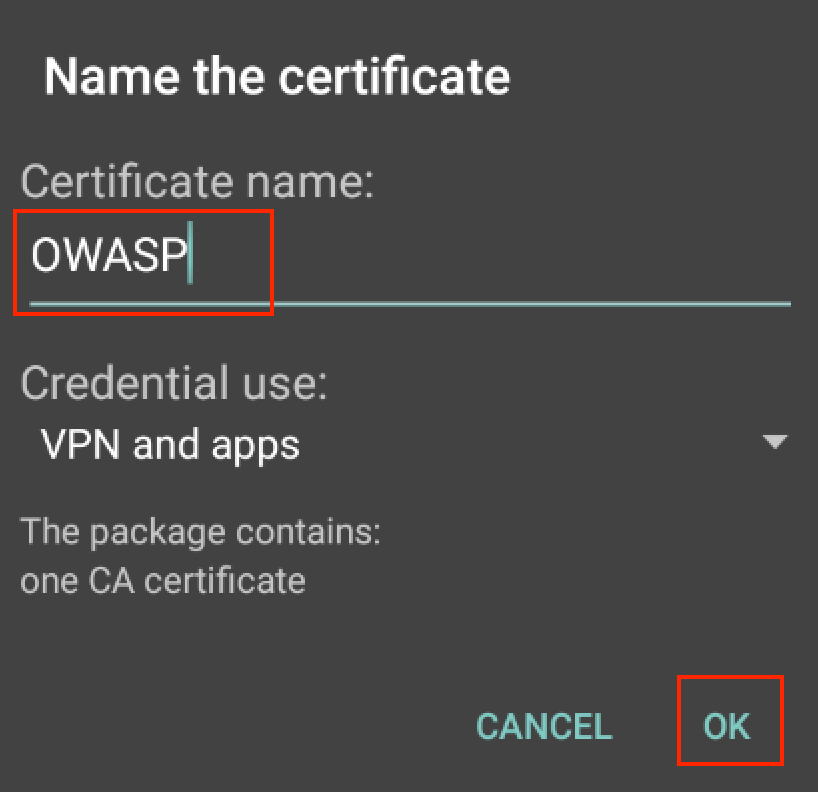
A dialog titled Name the certificate will pop up. Enter a name, leave Credential use set to "VPN and apps," and select OK to install the certificate.
Note: If the device does not have a screen lock PIN or passcode, a window will pop up requiring one to be set.
When you are not using the device to test, remove the certificate. To remove the certificate, go to Setup --> Security --> Clear credentials.

Click OK to clear credentials. Only the user-installed credentials are cleared.

- Return to Navigation: Getting Started
- Return to Navigation: OWASP ZAP Proxy Setup
C4.5 Observing WebSockets Traffic Using ZAP Proxy
WebSockets is a communication link separate from http that browsers and application servers can use to pass information back and forth. It is normally a secondary form of communication that is connected after the Web application loads into the browser. If an application uses WebSockets, the traffic is of interest for security testing because it may contain personal information of the account holder or other users of the system.
ZAP Proxy supports the viewing of WebSockets traffic. (Note: Firebug does not support viewing of WebSockets traffic.) By default the WebSockets pane is not one of the choices shown in the toolbar at the center of the ZAP display.
The WebSockets pane can be added by clicking the green "+" and selecting WebSockets from the drop-down menu.

The pane will also be added automatically to the toolbar by ZAP if a WebSockets connection is opened through the proxy. A view of the WebSockets traffic pane is shown below. Clicking on an individual message will show the full payload of the message in the upper pane of ZAP (where http requests and responses are normally shown).
From the WebSockets view, it is also possible to determine whether the WebSockets traffic is sent over an encrypted connection. The steps for checking whether the traffic is encrypted are detailed in Section E8 Observation of WebSockets Traffic.

- Return to Navigation: Getting Started
- Return to Navigation: OWASP ZAP Proxy Setup
- Proceed to the next chapter: D. Preparing Firefox for Testing